Google Analytics is one of the best free and powerful analytics tool for tracking and analyzing your website or application’s traffic, helping you make informed decisions based on user behavior and engagement. It’s used by millions of websites to analyze user actions, performance, and much more.
Adding Google Analytics to your website is usually a simple process and can be done in several ways, depending on your website setup and preferences.
For WordPress, you have simple ways to implement the HTML code to implement tracking features. In this guide, we’ll review three methods of adding the code to your website’s header section:
- Using Plugin for WordPress
- Add Manual Code in Theme Site Editor
- Add Manual Code in Theme Functions File
- Verify Installation
Using a Plugin for WordPress
For WordPress users, installing a plugin is one of the simplest and most convenient methods to add Google Analytics. Plugins streamline the process, providing an intuitive interface to manage analytics settings without requiring any code.
First, log into your WordPress dashboard and navigate to the Plugins section. Then go to the “Add New Plugin” sub page or top button.
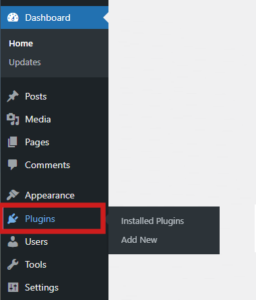
Search for “google analytics” for many plugin option, most fulfilling need of adding the code suite.
“Site Kit by Google” is Google’s official plugin for integration with their web services including Analytics, AdSense, Search Console, speed test insights and more. “MonsterInsights” is another popular choice. They both offer comprehensive features for tracking and reporting.

After choosing a desired plugin, install and activate the plugin by clicking on each of the respective buttons. Once activated, the plugin will typically add a new menu item in your dashboard.
Access the plugin’s settings, where you will be prompted to connect your Google Analytics account. This will involve logging into your Google account and authorizing the plugin to access your Google Analytics property data. You may need to provide your tracking ID, which you can find in your Google Analytics account under the Admin section.
Save your settings, and the plugin will handle the rest, including embedding the tracking code into your site’s header.
Adding Code in Theme Site Editor
You can also add the Google Analytics tracking code using the theme full site editor and creating HTML block in the header section of your WordPress site.
Once you obtain and copy your Google Analytics tracking code, go to your WordPress’ Site Editor. You’ll find it on the left side menu under “Appearance.”
Once you obtain and copy your Google Analytics tracking code, go to your WordPress’ Site Editor. You’ll find it on the left side menu under “Appearance.”
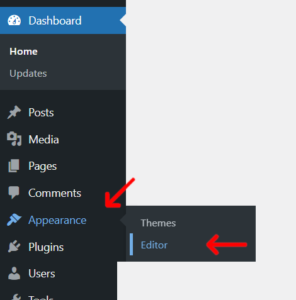
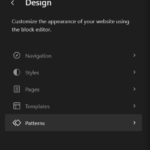
In Site Editor, you’ll want to edit a pattern that appears on every page, specifically the Header pattern and add a custom HTML block with your code.
(If Site Editor is not available for your theme, you’ll need to add a custom block within your theme’s “Customize” page if available, or with a plugin or manual code.)
Verify installation by checking the Real-Time reports in Google Analytics to ensure the code is working, or by viewing your website’s source code or using the Google Tag Assistant browser extension.
Add Code to Theme’s Functions File
You can also manually add the code to your theme’s functions.php file, allowing it to show on every page. This is slightly more advanced and best recommended for developers since your modifying direct files and implementing wrong code (sometimes even a simple additional character) can crash your entire website. When modifying actual files, it’s best to take a backup of your WordPress website, or take a backup of the file being modifying (in this case, making a copy of the functions.php file named functions.php.bck so you can recover in case of any errors)
To find and edit the theme functions, navigate to Appearance or Tools > Theme File Editor within the WordPress dashboard, or your web host’s File Manager tool. Find and select the functions.php file from the list of theme files on the right.
Have your Google Analytics tracking code copied or handy. Add the following code snippet to the functions.php file:
function add_google_analytics() { ?>
// Replace this line with your Analytics Code
<?php
}
add_action(‘wp_head’, ‘add_google_analytics’);
Replace the entire line beginning with “//” with your actual Google Analytics tracking code HTML then save your changes.
Verify Installation
As with the previous methods, check your Google Analytics dashboard, website source, or utilize the Google Tag Assistant to ensure that tracking is working.
You can also utilize your browser’s Web Developer Tools (usually accessible with F12 on browser) or viewing source through your browser’s tools to ensure the code is properly placed. It usually begins with the line:
<!-- Google tag (gtag.js) -->Once you’ve refreshed on the Google Analytics and it has confirmed it can read your code, you’ve successfully integrated Google Analytics into your website. Now you’rre ready to gain valuable insights into your site’s performance and user behavior. After verification, go through setup choosing the method that best suits your needs and website setup.

Leave a Reply